Understanding Aspect Ratio
When offering printed photos to your clients, you are offering a level of service that others may not provide. But this comes with its own set of challenges and requirements, and possibly changes in how you shoot and edit your images.
How to ensure a photo will look good in print
The photo must be technically sound (in sharp focus and properly exposed).
Your editing monitor must be calibrated to ensure color accuracy of the finished prints.
The resolution and pixel dimensions of the digital image must allow for the it to be printed at the desired size.
You must understand aspect ratio so that you can compose and crop your images accordingly.
What is aspect ratio?
Aspect ratio is the proportional relationship between the width and height of an image. Aspect ratio is expressed as two numbers separated by a colon, written as Width:Height or Height:Width. These numbers can be a specific unit of measurement such as inches or centimeters, but for the sake of simplicity, we can just refer to them as units. Having a basic understanding of math and fractions will help you understand this.
Key Points and Examples
A square has an aspect ratio of 1:1; meaning both sides are equal in length, no matter what the actual dimensions are. A rectangle with an aspect ratio of 2:1 will have one side twice as long as the other side.
Many manufacturers of widescreen computer and TV monitors have adopted the 16:9 aspect ratio as standard. Monitors are sized by their diagonal measurement from corner to corner. A 21-inch monitor can have the same 16:9 aspect ratio as a 65-inch monitor, but with different overall dimensions. Older-style TVs and computer monitors were typically manufactured in a 4:3 aspect ratio (closer to a square than a rectangle) due to the technology limitations at the time as well as the dimensions of film.
Most professional camera sensors are configured in a 3:2 aspect ratio. A full-frame camera sensor measures 36mm wide x 24mm high. The largest number that both of these numbers can be evenly divided by is 8 (math: the divisor), which will get us 36/8=3 and 24/8=2, or 3:2. A crop sensor camera has a physically smaller image sensor, but it’s in the same 3:2 aspect ratio as a full-frame sensor.
Smartphones and other mobile device cameras will have varying default aspect ratios, but will usually allow you to choose which you prefer to use.
How Aspect Ratio Relates to Photo Printing
If you just skimmed over the previous information, we will mainly be focusing on the 3:2 aspect ratio and how it relates to your photos and cropping for print. If you are shooting with professional camera, the images will natively be in a 3:2 aspect ratio (due to the sensor dimensions), so any print size you choose that is also in a 3:2 aspect ratio will not result in cropping the image.
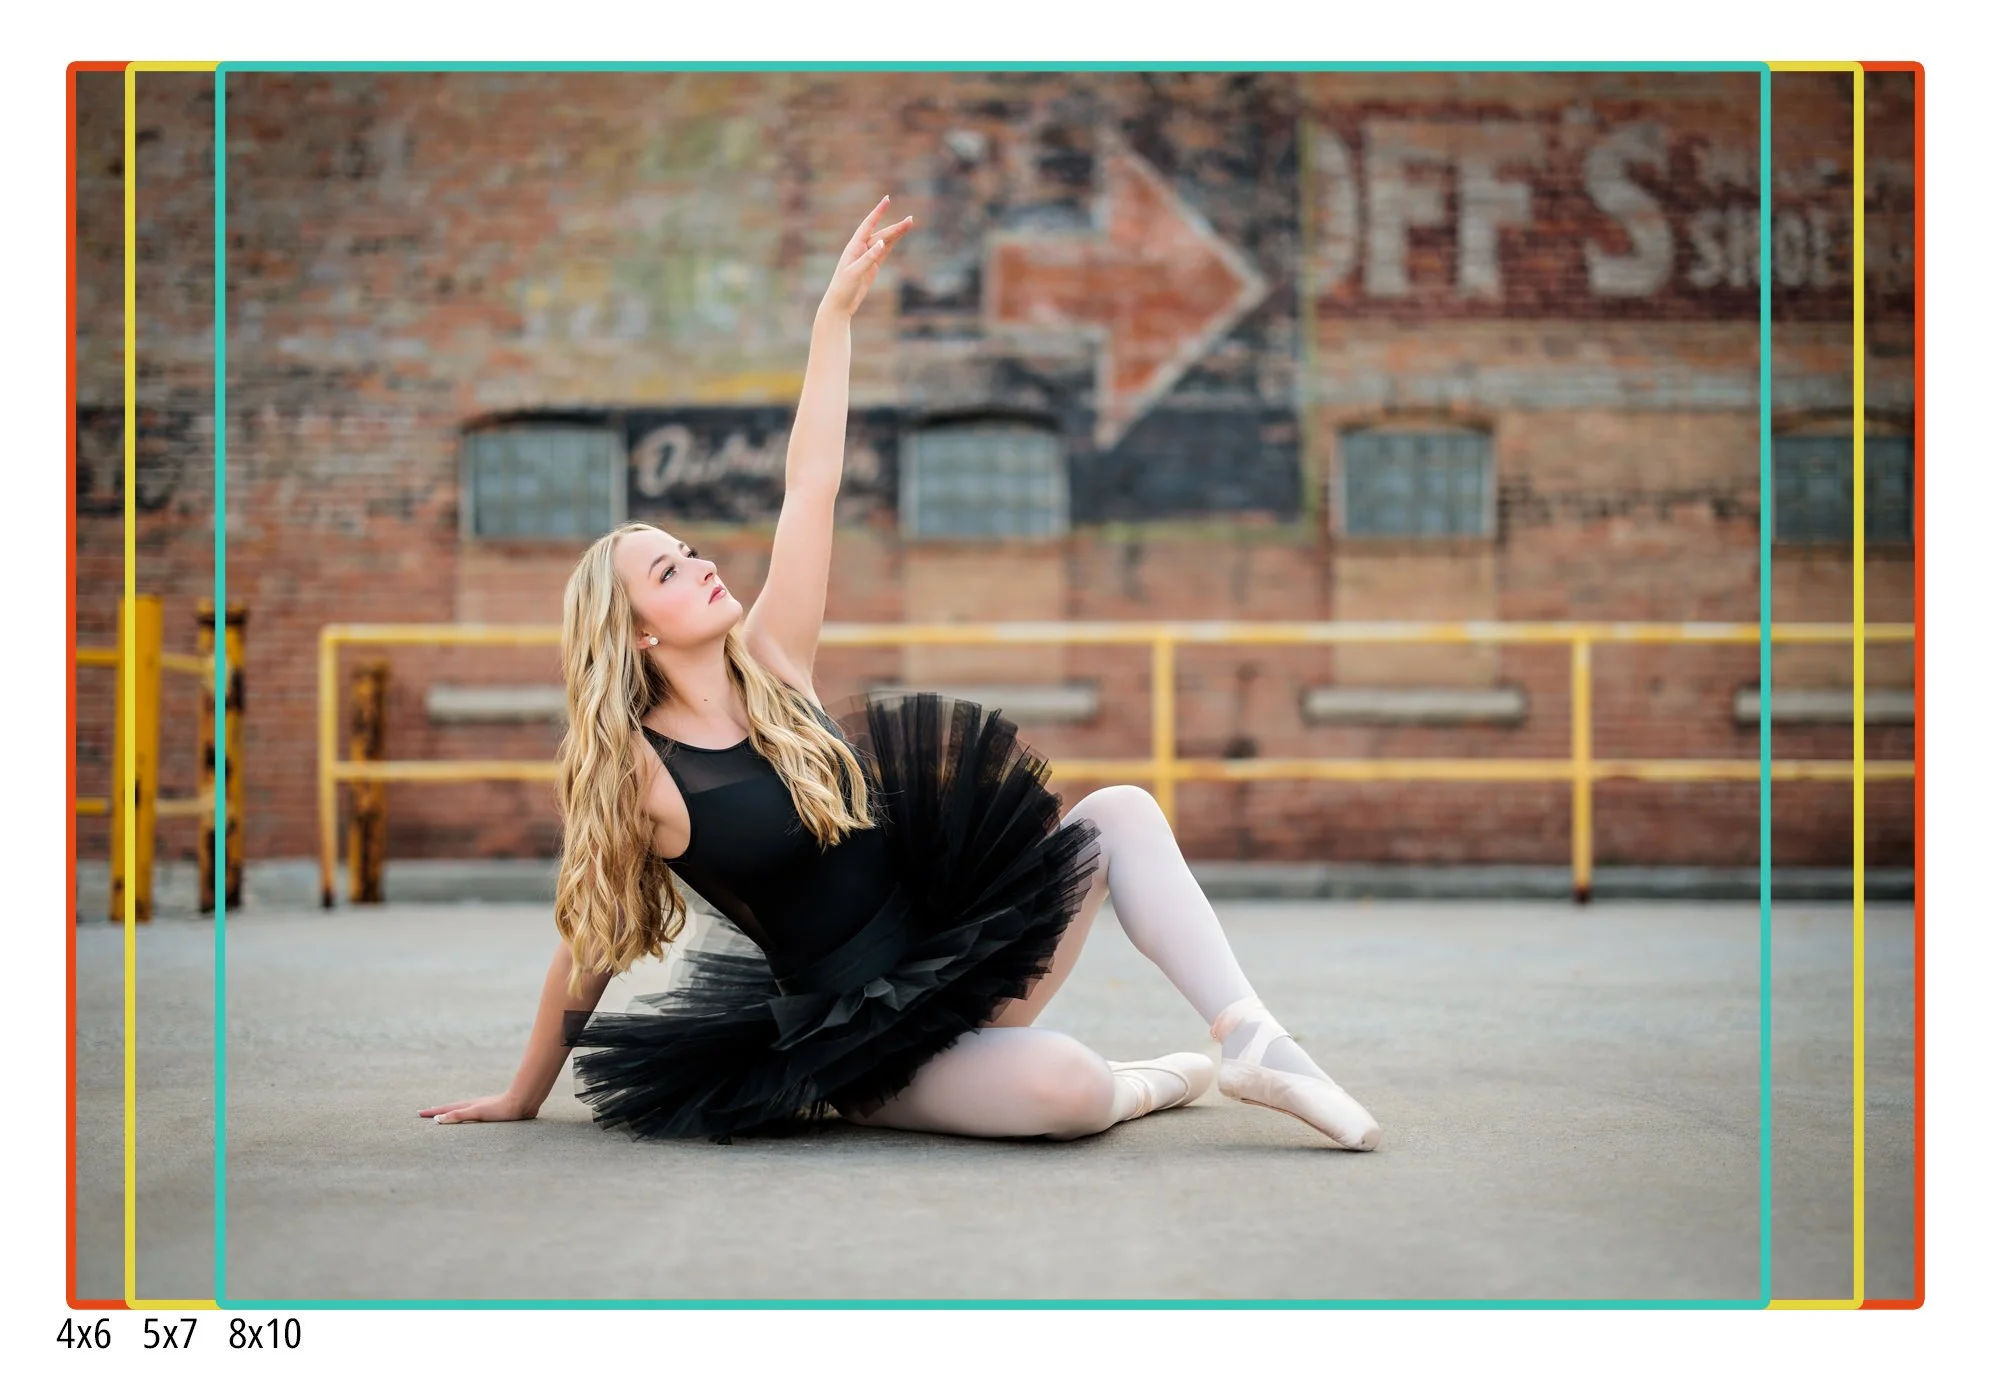
Standard print sizes in a 3:2 aspect ratio: 4x6, 6x9, 8x12, 10x15, 16x24, 20x30, etc. (Note that in the United States, typically the smaller dimension is listed first when referring to photo prints, so 3:2 and 2:3 mean the same thing.)
What if you want to print a photo at a different size that does not have a 3:2 aspect ratio? Other standard print sizes include 5x7, 8x10, 11x14, and 16x20. Because these are not in a 3:2 aspect ratio, some of the image will be cropped or trimmed off the long edge when printing. For instance, an 8x10 is in a 5:4 aspect ratio; this is closer to a square than a 3:2 aspect ratio, and therefore part of the image will be cut off. A 16x20 print is also in a 5:4 aspect ratio, so even though the image will be considerably larger than an 8x10, the same parts of the image will be cropped off when printing.
Because a lot of photographers, especially when they are beginners, don’t always understand this at first, it amounts to frustration when trying to print an image as an 8x10 or 11x14 and realizing that important elements in the photo are going to be cut off. These are just laws of physics and math, and there is no way around this.
What To Keep In Mind When Taking Photos
Make sure you leave a comfortable amount of negative space around the subject, especially on the long edges, to account for potential cropping. Zoom out or take a step back away from your subject.
Compose your photo so that no important elements are too close to an edge.
Try to take a level photograph. When your photo is crooked, you’ll have to straighten it later, which will require additional cropping.
Resist the urge to crop your photos unless necessary. Leaving some extra room will allow the images to be printed in a variety of sizes and dimensions.
Having a solid understanding and awareness of aspect ratio will allow you to create your art as intended and eliminate the frustration that comes from unintended cropping.
Roxanne Abler - Roxanne Elise Photography has been a professional photographer since 2011, specializing in senior portraits and headshots.